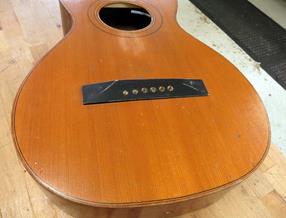
A problem that must be solved in each Gammel Gura is the stable. Most often they cannot be reused as they have been broken, taken or planed down. But if they are in good condition, I always try to reuse the original. If the stable is made of rosewood or ebony, it works well to replace the strip bar (like the stall leg) with a frozen stem as the wood is hard enough so that the stall leg does not lean forward by the force from the strings.
Only in exceptional cases do I leave the tape. It is very impractical and cannot be adjusted. You have to put in extra time and effort to straighten your neck so it will be a good string height and if it goes wrong you can not do much about it… With a stable leg you have all the options to adjust and you can choose a composite stable leg for better sound too.
Most cheap European guitars (and even old Levin), however, have a softer wood stall that has been painted black. It may be pear, birch or maple behind the black color. Often the string holes are too large and the area around a frozen stall leg must be strengthened.
If the string holes are too worn and large, I drill the holes with an 8 mm Forstner drill. This drill type cuts through wood that smears without chips and provides a very nice surface for a wooden plug.
The next step is to mill a ditch to be able to insert a piece of hard ebony where the groove of the stable leg will be cut out later. Uses the trick with masking tape on bench and stable underside with super glue in between. Licks one of the tapes to activate the super glue 🙂 Have a small cutter jig for the Dremel cutter. Does not cut through the entire stable but leaves about 1 mm of wood at the bottom of the milling. The hard ebony around the saddle ditch will hold the stable leg in an iron grip without failing at the leading edge of the rotational force from the strings.
With plugs in birch and a bit of ebony it looks like this.
This is where epoxy glue fits, as there are no joints to be taken apart and you want the glue to fill in all gaps. Mixes the glue with grinding dust of ebony that I saved in a jar to get a black joint. Noticeably worse! Clean what goes with red liquor and tighten a number of forceps and allow the glue to harden.
After gluing and a little planing and grinding it looks like this. Everything is covered with black stain and spirits.
Time to drill in new and narrower holes for the string pins. Suitable for giving the line of holes an intonation slope. Uses the oversaddle ruler to find the position of the holes between the E strings. Before I do this, I check against the grip board that the distance between the E-strings is the right one (which it was in this case, 57 mm between the center of the outermost holes). Always make sure that the holes are centered on the stall, the neck should still be adjusted sideways so why not correct any misplacement of the holes and the stall itself.
Drilling is done with a wooden drill with a sharp pin in the middle of my simple Christmas pillar drill. Has a spacer on one side to angle the holes a bit. Drills with a 5 mm drill almost through and turn on the stable. Then drill from the other side via the small hole from the tip so as not to chip the underside of the stable.
Phases of the string holes at the edges with a special tool from Stewmac. Uses the same tool to bevel the holes for the tuning screws, very good 🙂 When the stable is glued, I put black stain into the hole with the help of a tops.


Finally, the stable is glued. The position is measured accurately and marked with low tack masking tape. The underside of the stable is sanded clean, the cover where the stable is glued cleaned. The old holes are filled again with small round spruce pieces. The glue is a fresh batch of skin glue, lids and stables heated with a heat gun to extend the opening time of the glue. Is free with glue, it should be squeezed out a little glue when you force the stable. Most of the abundance comes with the tapes, wiping away what is left with a damp thin cloth and a practical spatula.
Black-lacquered stables must always be repaired before the guitar is fully finished. The main thing is that the sides are black, then there is little risk of scratching the lid.


