Making string pins with 4 mm pearl dot

It's been a while since I wrote a post on the blog. There are several reasons, partly because I mostly dealt with repairs that had been left for too long, partly because I spent computer time cleaning up my hard drives and digitizing my cassette tapes. In the meantime, the work has still continued in the shop as usual, and I have two finished GammelGura to present eventually.

The most time-consuming project has been hunting down all the song lyrics I've done over the years. They have existed in about 50 PageMaker and InDesign files since the late 1990s, often as copies and containing hundreds of songs with chords. My mistake is not keeping everything in order over the years and keeping track of the latest version of all texts, which bites me now. In order not to lose anything good, each original file has been saved as a large PDF file with up to 200 pages, which was then split into one file per page/lyrics. The name of the files has since been changed to the date of the original file and the name of the song, each song has then received its own folder. After going through all the original files, each folder has between 5 and 30 versions of the lyrics and the number of folders/songs is just over 400, there are probably a few more to be found. It has taken its time!

My old cassette tapes, about 60 of them, have been digitized, and the large files have been cut up into pieces. Half of the tapes are unfinished ideas or the very first versions of finished songs in little snippets recorded on my little dicta phone. Good ideas have appeared that must become finished songs, but also almost finished forgotten songs. Some very early recordings from the early 1980s as well. Say what you will, the cassette tapes are lousy quality, but they're still around! I'll go through the sea of ​​ideas with nonsense lyrics and traditional chord turns and refine what happens to be good, it's already become a new song from a good melody on the first tape that never got its lyrics.

For the past two weeks I have been floored by a bad cold. Not much was done apart from watching all the TV programs with gold diggers, crab fishermen, auctioneers, finders, renovators, treasure hunters, antique dealers etc. etc. However, I did managed to clean almost the whole apartment and replant the flowers as well. I got exhausted of watching TV whole days!

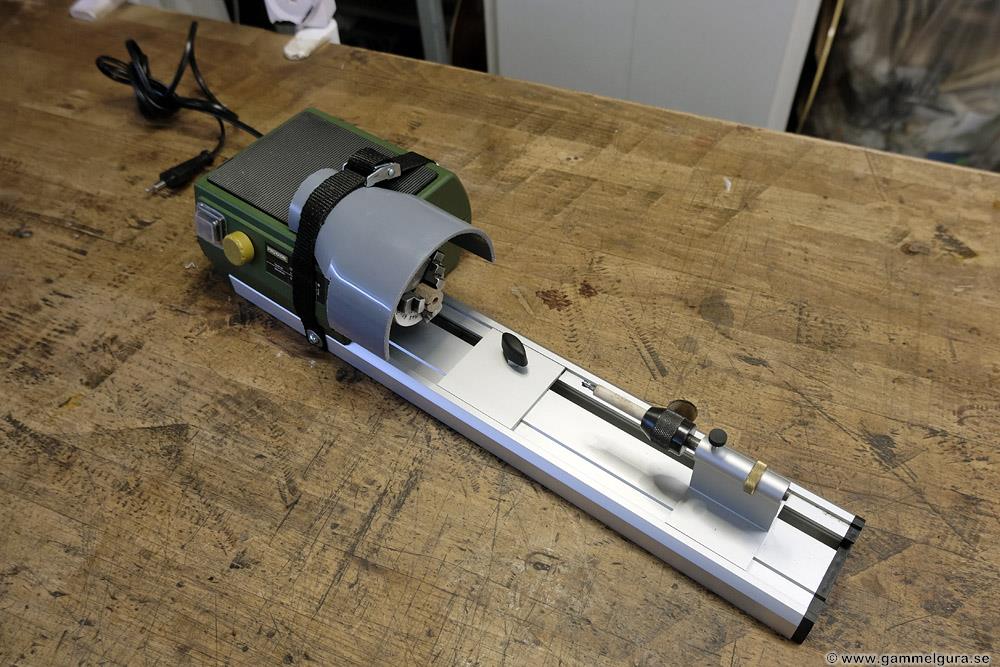
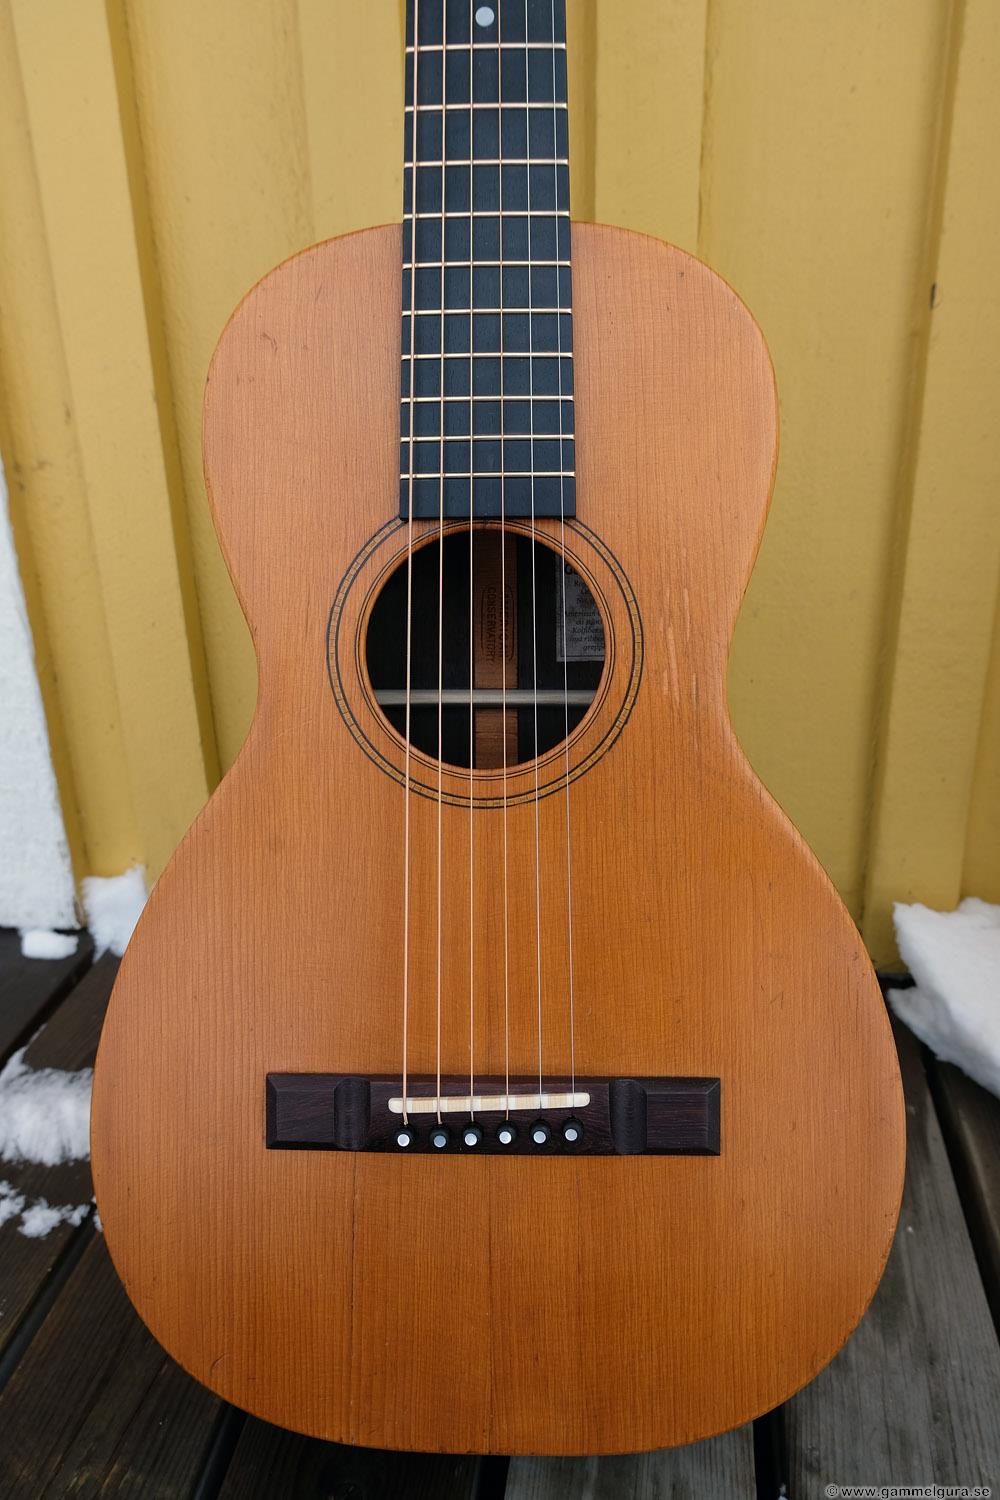
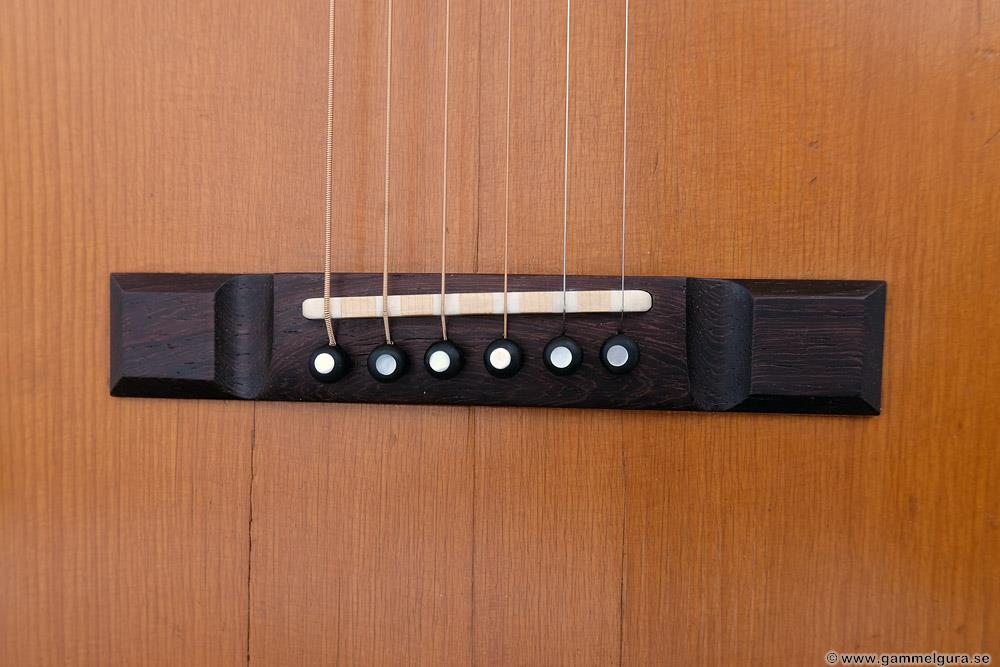
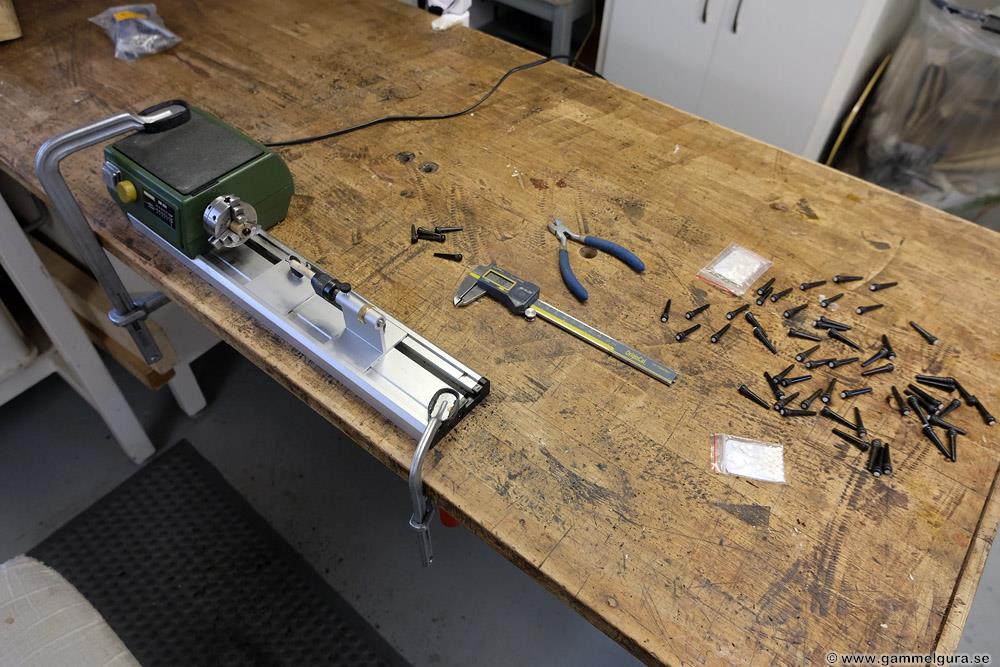
Yesterday was the first day I felt healthy enough to make it to the shop. About six months ago I invested in a mini lathe intended to be used to drill out centered holes for a 4 mm pearl dots in solid Waverly ebony pins. Old hand-made solid string pins from the 1930s and older are always made of wood, usually made of ebony, and with a significantly larger pearl dot than in modern string pins. The old original pins are often missing or are in too bad a condition. New pins are almost always needed, but new pins in the style of the old ones are not available for purchase.

I have tried different methods and jigs to drill the pearl dot, the problem is that it is extremely difficult to center the hole. A misalignment of a few tenths of a mm is enough for it to look crooked. I've gotten the best results by aiming with the eye and hoping for the best. But it was labor-intensive and in a batch of 60 pins there were always about ten pins where the dot ended up too crooked and one or two pins that broke, very few were perfectly centered. My intended solution to the problem had to be the mini-lathe. When I bought it, I already had a large stock of finished pins, only now it was time to try it in practice.

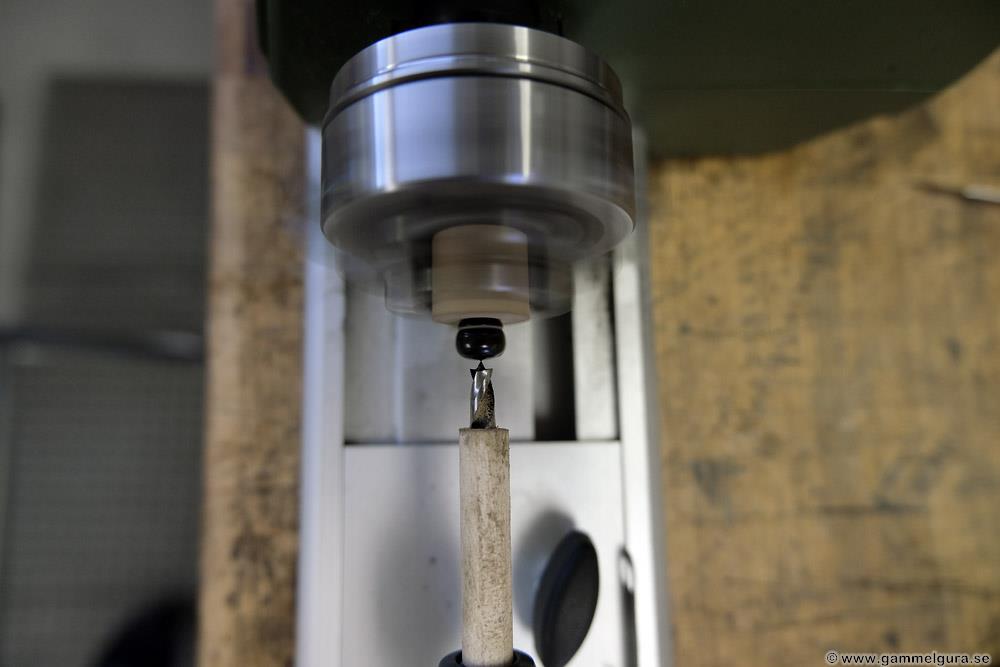
The lathe, one Proxxon Micromot DB 250, was supplemented with a large  chuck and a small chuck. The principle is to attach a round oak rod to the large chuck that spins and use drills in the small fixed chuck to make a hole in the middle of the round oak rod into which the string pin can be pushed. With a 4 mm drill, the hole for the pearl dot can then be drilled centered in the string pin. After a bit of experimenting I found that the standard string pin reamer could not be used in the oak rod, the hole became off-centered. Only if I used a fairly large drill bit (5,3mm) did the string pin stay still when the lathe was running. Furthermore, I had to stiffen up the 4 mm drill with a sleeve of epoxy-glued birch so that it would not bend when I drilled. The sleeve was easily produced in the lathe. The slider with the drill was also a little loose, but I fixed that with a 0.3 mm feeler gauge.

By pushing the slider with the drill against the string pin, it was easy to drill the hole, the string pin could then be prayed free with small pliers. The lathe also had a stop for the slider, so I didn't drill the hole too deep or too shallow.

It felt a bit scary with the protruding jaws on the big chuck when the lathe was running, I'll make a guard before I use it next time!

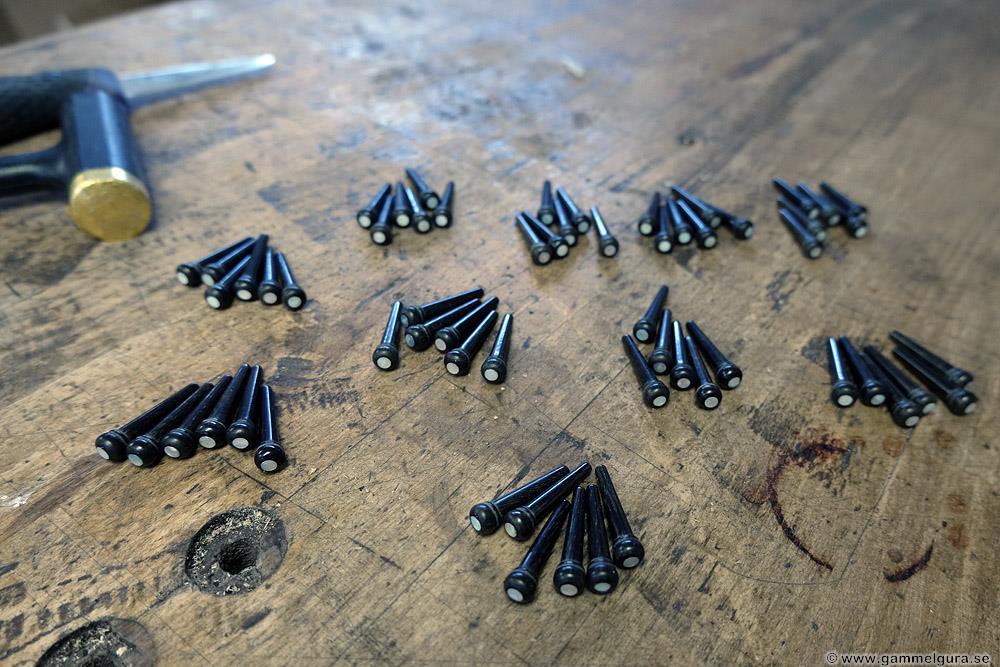
The result was successful. Out of 60 pins, there were about 5 that were not quite perfectly centered, probably some of the first ones before I found the right method. It was much faster to make the pins and there is no risk of any pin breaking.

After gluing the pearl dots with number 20 Stewmac superglue and a little sanding of the top (the head of the pin is round and the dot flat) there are pins enough for the next 10 GammelGura. A cheap 5 degree reamer has been ordered, it will be butchered from the handle and allow a centered and tapered hole to be drilled in the oak bar instead of the straight 5,3 mm drill hole for a better fit to the string pin.

A protective guard was made from a piece of plastic pipe.

To adjust a saddle

When I adjust the height of the saddle, I use a genius tool to sand away material from the bottom of saddle blank. I bought it many years ago direct from the inventor in Italy when I immediately realized that I had to have it.

My way of working when I adjust the saddle is as follows:

  • Make a saddle blank that fits the length and width of the ditch in the bridge and that is at least 2 mm too high.
  • Sand down the top of the saddle 1 mm on the treble side.
  • Shape the now sloped top of the saddle to the fretboard radius, first using a fretboard radius measuring tool to roughly shape the top and then a sanding block of the same radius to smooth out the curve.
  • Mount the too high saddle and string up the guitar.
  • If the nut is not already adjusted to the correct height, I put a 0,45mm feller gauge on top of the first fret for the thick E string and a 0,3 mm feeler gauge over the first fret for the thin E string. A capo is attached above the 1st fret. That way I can disconnect the saddle and fake the string height you get above the first fret with a typical zero fret.
  • I measure the actual string heights at the 12th fret for the E and E strings with two sets of feeler gauges. I write down the measurements.
  • I subtract the string height I want at E/e (in my case, 2,5/1,5 mm) at the 12th fret from the measured string height for both the E and e strings and write down the results. I double these numbers to get how much the saddle leg should be lowered at the E and E string positions. I write down the result.
  • Since my tool has an air gap of 0,3 mm down to the grinding surface, I add 0,3 mm to the two measurements and write down the final measurements. I also put a pencil mark at the bottom of the saddle on the E side, so that I don't turn the saddle the wrong way in the tool.
  • Using two sets of feeler gauges with the final thickness i have to grind down the underside of the saddle at position of the e and E strings, I can fasten the saddle in the tool with the saddle sticking out exactly to the thickness of the two sets of feeler gauges . The feeler gauges are placed right next to the protruding saddle on the bottom of the tool at the E/e string positions and the height is adjusted with the two adjustment screws in the tool until my fingers tell me that the bottom of the saddle and the two sets of feeler gauges are both even.
  • I firmly attach the saddle to the tool and roll away on top of a flat board with adhesive sandpaper until there is no more resistance from the sandpaper when rolling.

When I'm done, the saddle is mounted in place and I have the perfect string height at the 12th fret with the nut adjusted to the heights I get from a zero fret. I also have a completely straight and square bottom in the saddle. When the oversaddle has been adjusted to "zero fret height", the top of the saddle is intoned in place string by string with files, without filing down the height of the bridge leg. This mechanical way of doing it does not require much concentration and the result is predictable. I just do it and it works perfectly every time.

A 1 mm thick rosewood shim is also glued into the segmented saddle on the underside, and the tool is used one last time. Then I also have the chance to make a small final adjustment to the height of the saddle.

GG201 Levin 1938

It all started with a Levin that was found in a garbage room. I brought it home for a GammelGura restoration, but it just so happened that I just bought a similar Levin in better condition at a local auction with the serial number from the same year and close to the one from the garbage room. We agreed to change the guitars as the one from the garbage room was in significantly worse condition.

To me this is an almost like a new guitar, but what I like is that the headstock is straight and simple and not as flared as they became in later Levin of the same model. In addition, early Levins like this have real mother-of-pearl in a fretboard of the finest rosewood! It was in good condition apart from a few nasty drying cracks in the top and bottom, nasty because they were wide and uneven and also on a burst. The bottom and sides in flamed birch and the whole guitar lacquered in an early variant of cellulose lacquer, surely in any case on the top where the lacquer was cracked.

The first repair was the cracks in the top and bottom. I started by soaking up the bottom and forcing and gluing the crack together using hot hide glue and a cool fiddle side clamp, but it works very well on a guitar too. A triangular stick from a similarly scrapped Levin was then glued into a triangular cut-out trench. Clear glue had been smudged in a previous repair, which was scraped off with a razor blade with a back. Before gluing, the bare wood was stained with Swedish made Herdin's Carl Johan brown water solvable stain. The same procedure, but with a spruce stick from a scrapped top, was performed on the top.

I took some pictures of my adjustable "magic wand" that I use to measure and cut new braces to the correct length inside the top. It works very well!

The neck had a carbon fiber rod glued in, and then the fretrboard was glued after sanding to a 16″ radius. As usual with Levin from the same era, the frets were not placed in quite the right place. Typically, the 2nd and 4th fret does not fit correctly. The fine fretboard had to be preserved, so the frets were plucked loose and the fret grooves filled in with rosewood sticks. New slots were cut, most of the new frets covered the sticks in the old slots, except for 2nd, 4th and a few more. I'm sad that the gold-colored EVO frets have just stopped being produced, but I still have a small batch of the world's best frets. Going forward I will use Stewmac's gold colored variant which might be just as good.

One of my quick-made clamping jigs was used to saw the new fret slots straight and in place. Jigs like this usually only take me ten minutes to figure out and make with off cuts from one of my boxes with scrap wood.

The bridge was changed to a modern looking peg bridge in the best rosewood instead of an ugly original that was string through and similar to the bridge of a nylon-strung guitar. With a finished bridge, the correct location on the top could then be marked with low-adhesive tape and holes drilled for the four 8 mm plugs, 4 mm above the center of the stringpin holes. Small pieces from a cut up wooden blind purchased at a flea market are good as a sacrificial counter for the drill. Next, the bridge was glued with a fresh batch of hot hide glue.

As always on old Levins, the neck foot was not a true dovetail, and a wood screw with deep and sharp threads was drilled and screwed in from the inside of the neck block into the neck foot. I have started using a lock washer to prevent the screw from loosening. As usual, the hole in the neck foot was reinforced with thin superglue. The screw was waxed and screwed in and out a number of times in the hole to give the hole the same shape internally as the threads, this makes it easy to fasten the screw through the sound hole when the neck is glued and tightened with a short Phillips screwdriver.

To avoid having to fabricate and glue a triangular shim under the fretboard on the top, I'll wait to glue the brace above the sound hole. If it turns out that the neck angle needs to be large, the top can be pushed up by that brace with a greater curvature on the underside and seal the gap between the fretboard and top under a straight fretboard. To test the geometries, I use the bottom as a template, it is necessary to shape the sides to the same shape as the bottom. To do that, I have an adjustable rod between the neck and bottom blocks and some adjustable straps to pull the sides together if needed. With the right shape of the sides, the neck block and the neck gets the same angle as after gluing the bottom in place.

The neck is screwed on and a first adjustment of the neck angle up/down and side/to side is made by grinding the foot of the neck at the bottom. Without a fretboard, I usually use two 0.5 mm feeler gauges on top of the fretboard and then adjust the neck so that the straightedge ends up exactly on the top of the bridge. The neck on the Levin tends to move more with strings at tension, so in this case I also added a 0.35 mm feeler gauge on top of the bridge to get a neck angle with higher saddle (which can then be ground down if the neck moves). As always, you have to guess, no two guitars are exactly like the other. It turned out that the brace above the sound hole needed to be bent a little more than usual to push up the top and seal the gap between the top and the bottom of the fretboard. To secure the ends of that brace, a slightly longer stop block is glued to the side. These stops are a bit tricky to manufacture as there is not a single straight angle on the glue surfaces!

The bottom was glued with my bottom gluing jig, nowadays with pure hot hide glue on the neck and bottom block and hot hide glue with about 15 weight percent urea dissolved for edges to give the glue a longer open time. What is new is that the stop between the neck and bottom block is made from a threaded rod, wing nuts and leftover pieces of the carbon fiber rod I use for the neck. They are a little nicer than the old wooden ones.

The neck was glued in place after another adjustment of the neck angles, most of the work was already done so it didn't take long. The guitar was strung with old worn Newtone Heritage 0.12 strings, an old matching nut and drills as a temporary saddle. Nowadays, the guitar is allowed to hang with strings at tension and vibrating for at least a day. It takes a day or two for the glue to dry completely and the neck to sit with tensioned strings after gluing the bottom and neck.

The guitar is placed in the jig purchased from Stewmac, which holds the neck in the same position as when the strings are at tension, in two rounds. First to sand a relief of the fretboard and secondly to crown the frets after fretting. My CNC-machined aluminum profile with a 0.15 back bend "relief" is the perfect sanding block for a self-adhesive sandpaper. After sanding, the fret slots are sawn to the correct depth and the fretboard is prepared with oil and Squalane before the frets are pressed in and glued with number 20 superglue.

I read in an article that you shouldn't mount all the straps in sequential order to reduce the backward bend you get when the frets are pressed in. A test I did showed that this is actually true. But it was too complicated to keep track of which fret you were going to mount and which one you had just mounted if you jumped between the first and last fret and then the one in the middle, etc. I have realized that you get the same effect if you simply first mount the odd frets in turn and then the even ones. You will also get more room to mount the frets at the bottom of the fretboard.

The tuners were cheap and loose and were replaced with new ones. One advantage of newer guitars like this one is that the spacing between the tuner posts has the modern spacing, it was easy to change to new tuning screws that fitted the old holes. The fretboard got new finer and thicker pearl dots as the old ones were very thin.

The neck was varnished with a thin layer of spirit varnish, for the first time, with a rubbing pad and oil that is used in French polishing. The result was very even and good. On the other hand, I was less successful on the body with the rubbing pad, for big surfaces the fine-haired brush that I always used before is better. I removed the failed varnish with spirit on the body from the first attempt. It turned out that I didn't need any more varnish after that, I just needed to polish the old cellulose varnish. Sufficient amount of the varnish remained in all the dings after the spirit removal. Before painting, I also went over the lacquer dings with Herdin's stain of the right color, the end result was better than expected. The guitar looks very nice with its burst and dark brown fretboard and bridge.

After a solid vibration period of 4-5 days, there was a lot of sound in the box. It sounds very good, the slightly narrow fretboard and the C shaped neck are to my taste as well. It's fun to play!

Mise-en-place

I am currently reading an interesting book, Work clean by Dan Charnas. It is about a way of organizing the work in a way that is used by all commercial chefs who have high demands on themselves in order to work both efficiently, well and quickly. They call it "Mise-en-place". By planning both the time and the tasks, work can be made more efficient and you get more done.

When I read the book, I realize that for a long time I worked with roughly the same things, e.g. keep the workbench clean so I don't have to look for tools, put the tools that are used the most near the workplace, make sure materials are at home before they are needed, start heating the glue before I have to use it, prepare for the next batch of glue, clean the room before I go home and do all the work steps in the correct order. Fast, but still with quality. Mistakes always take the longest, so it's important to learn from them.

Of course, I still have a lot to learn, but once I have read the book, I will tackle some tasks, such as e.g. measure how long the various stages take on average. Hopefully I can work more efficiently, that wouldn't be wrong 😉

GG199 American conservatory circa 1900

Work continues with ongoing batch, one that has already been completed and delivered is an American American Conservatory parlor. Although I have a stamped serial number, 79982, I have not been able to work out when it was manufactured. Probably around 1900, but maybe a little later. It is rare to see similar guitars in Sweden, but those that exist have probably accompanied returning emigrants. The shape resembles a Levin parlor, not so surprising since Hermann Carlsson Levin more or less copied the shape and construction from the American parlor guitars he made in New York during the 1890s.

The woods were luxurious, the finest rosewood in the bridge, bottom and sides and light and light mahogany in the neck. The fretboard, on the other hand, was a disaster, ebonized pear wood (most likely) with about the consistency of biscuit chocolate! The fretboard had to be speared loose into a thousand pieces. During the ebonization, high heat and aggressive chemicals were probably used, which have destroyed the wood over time. The spruce top was in good condition with a few cracks. The bottom was incredibly thin, only between 1,5 and 1,7 mm. Normally it should be about 2,3 mm thick! I had to be extremely careful when I loosened the thin bottom along the edges where it was still a little thinner. Another thing about the bottom was that the inside had a very smooth and nice surface, almost polished. It was also unusually evenly thick. There is probably a reason why, perhaps they deliberately built an extremely light guitar. Even the mahogany neck was light as a feather without the fretboard. The top, on the other hand, had normal thickness. The guitar was probably sized for gut strings. The ribbing in the top was sparse with only two braces and a fir stick under the bridge in the top, the bottom had only three braces.

It was in good condition, except for some cracks in the top and bottom. The biggest problem was that one of the sides had completely detached from the end block, which was also cracked in half. Unlike a Levin parlor, it had a dovetail. The bridge was not in good condition and too narrow for an intoned saddle, so a replica in the finest rosewood was made. The fretboard was replaced with a new one in ebony. The customer wanted to keep the original tuners which were in good condition for their age, almost as good as new. No side dots on the fretboard or a guitar band knob on the neck foot should be mounted, however a K&K mic.

The braces came off without a problem, to soften the glue and loosen the fir stick under the bridge I heated it with a small travel iron. The loose rim was a bit tricky to glue back to both the end block, top and sides, you have to press from three sides at the same time to get tight joints. But with various cauls and clamps it worked out well. I always use a soft steel plate as a counter-hold on the outside and plastic foil to avoid gluing the cauls in place.

With the fretboard off, I was able to sand off the glue and fingerboard residue on my sanding board while flattening the neck. In cases where the neck has a noticeable bend, I first heat it straight. This one could be sanded straight. The neck was very light and in light colored mahogany. The neck had its carbon fiber rod milled in and glued, it's a step that I do at the same time for all guitars in the current batch.


The top had narrow cracks around the center joint. They could be pressed together with the top bracing removed and glued with hot hide glue. This is one of the many good features of the hide glue, you can dab on and massage the glue into the crack and then wipe off the excess with a damp cloth. The clamps on one half are tightened first, then the clamps across to compress the crack, and finally the clamps on the other side. Cauls are then clamped onto the inside of the top to keep the top flat across the crack. When the cauls are in place, you can then detach the long side clamps, the stop blocks towards the outside of the rim and other clamps that are no longer needed. It's always exciting to "open the package" after a gluing like this the next day when you can't see exactly what you're doing, but so far it's always been a good result!

The crack at the end block had also spread a bit on one side of the rim, a piece of rosewood veneer was glued on. It is important to get even pressure on the entire veneer, for that I use small cauls with a 4 mm soft yoga mat that molds to the bend of the edge.

The most artistic thing I get the chance to do at all GammelGura is the new bridge. I have a stock of rosewood and ebony blanks, I chose a rosewood blank of the finest variety. To make the job a little faster and easier, I use a wood drill to drill out the channels between the middle of the bridge and the pyramids at the ends. An old maple table leg is a good platform when shaping the bridge.

The channel is widened and thinned down to approx. 2 mm at the edges. The pyramids must be lower than the middle part, the height is cut down with a Japanese saw or my small band saw.

The bridge is rounded off towards the back with grates. A nice detail is to give the edge at the back a slight, even bend. The small razor files are perfect for fine-tuning as they leave a smooth surface.

The pyramid bridge on this guitar had a flat top on the pyramid. A stick with coarse adhesive sandpaper is also a good tool.

The string pin holes are measured and drilled before the bridge is glued with freshly made fresh hot hide glue.

The ebony fretboard was given a 16″ radius and a scale that places the front of the bridge bone about 4mm into the bridge. The bottom got four ribs instead of three, the top the patented GammelGura bracing with plugs and bridgeplate in spruce.

Before the bottom is glued, the string pin holes are reamed and a groove is filed in the bridge plate, top and bridge for the strings and for solid string pins. I have tried different ways to make the groove, the fastest way is to use a needle file rasp. They are rare, but they are available for purchase. Some cut NH 0,12 strings are used to fit the string pegs so that they are tight, but can be loosened with your fingers.

The gluing of the bottom and neck went well and the guitar had to hang for a couple of days with a vibrating aquarium pump with strings at tension, the neck usually moves a little the first few days before it finds its final position. Typically, the string height at the 12th fret increases at most 0,5 mm, but sometimes not at all.

It will take a couple more days before the guitar is completely ready. The most tedious part is measuring the intonation, but it is something that must be done. With the measured values, it is easy to mill the bridge in the right place and manufacture a segmented saddle.

The sound in this GammelGuran is a bit special, an unusual amount of jingle&jangle! I think it's due to the rosewood in the bottom and sides instead of the usual maple/birch. The wood in the bottom and sides is important and shapes the sound, even if the top is the part that accounts for most of the sound. Because it was so lightly built, I strung on NH 0.11 strings, which is equivalent to regular 0,10 strings in tension.

The pictures of the finished GammelGuran were taken on a cold winter's day on the bridge outside the shop.


Low tension strings

I try to keep a stock off Newtone Heritage 0.12 and 0.11 strings in my shop, but sometimes I only have enough for the ongoing batch. I also usually have a few NH 0.10 sets and regular Newtone Masterclass 0.11 sets in stock. Right now the stock is low, but a new load is on the way. It usually takes a couple of months from order to delivery, it seems that their website is often out of stock as well. Something happened during the pandemic and after Brexit, I hope it straightens out. With new prices for customs and shipping, they now cost SEK 140 per set if I have strings to sell. Postage is usually SEK 30 or SEK 45 within Sweden depending on the number of sets. If you want to order, send an e-mail and don't forget your name and address. I also have single strings in stock, it happens that one of the spun strings does not quite intonate as it should or that a thin E string breaks off when measuring the intonation.

I would also like to remind you that you should never cut round core strings during assembly before they are in place and tuned. The top 10 centimeters of the string is flattened during manufacture so that the string does not spin up, if you cut the string at the top first, there is a great risk that it will completely lose its intonation! I have also been told that the unspun strings in NH are no different than regular unspun strings, so they can be replaced with strings of the same thickness from other makes.

There is actually another similar low tension string to buy from Thomann in Germany, Optima Vintage flex. It seems to be more or less a copy of the NH 0.12 with the same string thicknesses and low tension. I have not tested them myself, but reviews online say they are equivalent to the NH strings.

Another low tension string with roughly the same tension as NH 0.12 is GHS Thin core Light.

Otherwise, it always works with any steel strings with normal tension if they are just a notch thinner than the NH strings. Then you get approximately the same string tension that the guitar is built for. Pretty much all GammelGura get NH 0.12 and there you can instead string up the guitar with normal 0.11 strings. If it's an unusually brittle old guitar, I use NH 0.11, and then you have to make do with a 0.10 set of normal strings. The intonation of all GammelGura are measured with NH 0.12 or 0.11 strings. The intonation will not be exactly as good with thinner normal strings than the NH strings used when doing the measurement, but the difference is small and hardly audible to a normal ear.

Current batch, GG199-203

All tops have had their braces glued and adjusted. For the top, I use my collapsible go-bar and a baseplate with the same radius as the underside of the braces. Since I am gluing several large plates in the top, they need to be glued to a surface that is curved in two dimensions. The bottom braces, on the other hand, can be glued to a one-dimensional support with a matching radius.

The gluing takes place in two passes. The top brace under the fretboards is not glued, so I later can lift the top under the fretboard with a stronger radius on that brace if the fretboard gets a slope-off instead of having to make a wedge under the fretboard. The two large braces below the sound hole are planed down to 12-13 mm height and the ends are thinned down to almost nothing starting 7 cm from the sides.

Current batch, GG199-203

All guitars in progress have had their cracks glued (there were quite a few!). The bottoms have new bracings, the necks carbon fiber rods. All braces and bridge plates have been selected and cut, the braces have been given the correct radius and triangulated. Unusually, I didn't have to thin down either the tops or bottoms, as all thickness measurements were as they should be. Söderman's plywood bottom was indeed a bit thick, but that will not make any difference to the sound.

I also kept the replaced bottom for the European Parlor guitar with its mahogany frets, the bottom and frets were in good condition and also had a pencil note that I didn't want to sand off unnecessarily. Even Söderman has a pencil note in the lid, I think I can glue the ribs around it.

The next big step is to glue all the top braces, this will take a few days in my collapsible go-bar jig.

Interesting detail

I noticed an interesting detail on the 1926 Gottfrid Söderman lute that I'm currently working on. I think I've seen the same thing on other Söderman lutes, but didn't think too much about it. After some pondering, I think I found a reason why he cut two notches in the top just inside the edge of the fretboard. There must be a way to try and steer the almost inevitable crack in the top at the side of the fretboard to the underside of the fretboard where it is not visible. A bit like sweeping it under the rug. Gottfrid was an inventive autodidact, such a solution would be completely in his style. If that's not the reason, I have no idea why he did that!

You can see it did work on the normal straight edge of the fretboard, the crack came in the cut-out trench. However, it did not work at all on the side of the fretboard that is beveled.

T-frets

I got curious about exactly when the modern T-frets were invented after working on refretting a neck with bar frets. After a bit of Googling, I found the first patent of T-shaped frets of John F. Stratton, US Pat. no. 501,743, from July 18, 1893. Patents are not always taken by the original inventors or those who first used what was patented, so it is not incredible that similar T-frets were used a number of years before.

The Bay State guitar in current batch dated to circa 1888, which has T-frets that appear to be original - in any case, the fret slots are not as wide as they would have been with bar frets, may have had some of the first T-frets that were manufactured.

The modern frets with crown and barbs were patented by C.F Smith, Pat. no. 1,727,620, as late as 1927. I also found one new cool patent from 2010 with more flexible frets that should be manufactured and sold!

I took some pictures and measured the frets on the Bay State guitar from circa 1888.

They are similar to the fret in the patent, except for the longitudinal "barb" in the patent. I think the last one was what was needed to get the patent approved, and not very practical in practice. The Bay State nickel frets have instead been scored on the underside with a knife or chisel so that sharp bristles stick out and help to hold the fret in place. The frets have roughly the same shape and the same flat crown as in the patent.

The measurements of the low and narrow bands are:

Total height: 2 mm
Width of crown: 1,4 mm
Height of crown: 0,5 mm
Tang thickness: 0,65-0,7 mm