This GammelGura was made of a Levin parlor from the waiting room and 1916. It originally had a tailpiece, but was converted to a pinbridge for the best sound. The biggest problem with it was that part of the top around the sound hole was missing on both sides of the fretboard. In addition, the tailpiece always gives a light impression on the top during a conversion.
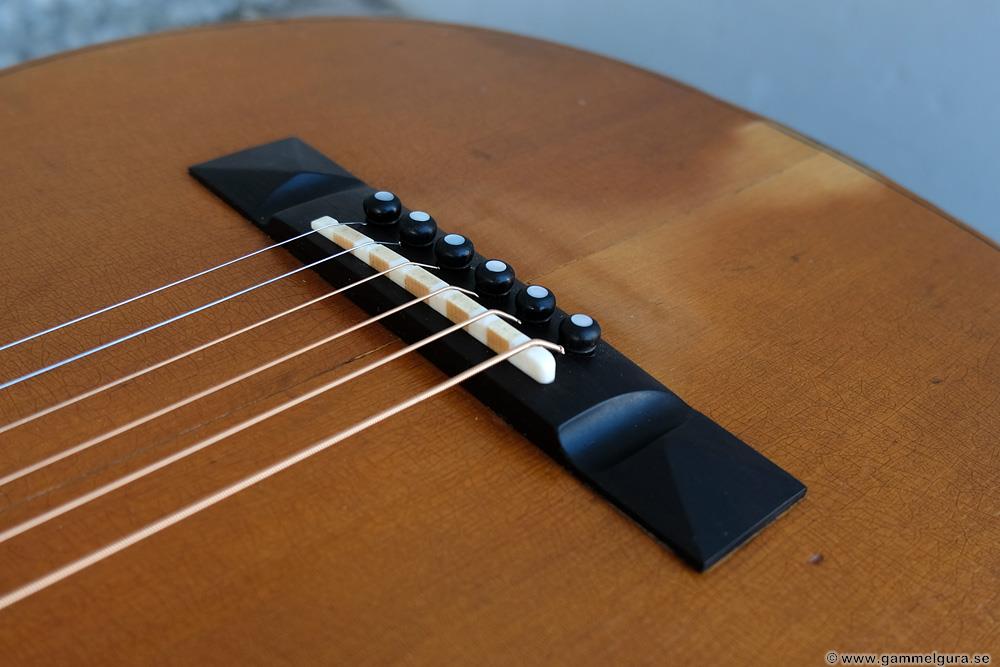
As on GG171, ebony was ordered in both fretboard and bridge. I have always said that rosewood is the best wood in both fretboard and bridges, but I can not complain about the sound in the last two GammelGura with ebony. On the contrary, they have sounded at least as good as those with rosewood. The material in the fretboard and bridge does not matter much for how the guitar sounds.
Both the top and the bottom were thinned in the usual order and the neck got its carbon fiber rod. The bracing in the top was the one I always do now with extra reinforcements under the fretboard and in the middle of the top. The bottom also got new braces with the third brace flat to give the bottom greater mobility.

I received an order for finer inlays in the fretboard copied from a more expensive Levin parlor. Levin had some special inlays, in addition to the round dots, which were used in most "high end" instruments. A star with round cutouts, a long narrow inlay and a horizontal diamond shape. I have taken the opportunity to take pictures and measurements of such during previous renovations. Per Marklund made replicas in mother-of-pearl of the highest quality of the special inlays with the help of pictures and a CNC cutter. They turned out very well! It took some time to fasten the pieces into the ebony board, but it turned out well.
It was more difficult to add the missing pieces in the top. I used an old scrapped top and did what I could to fit the new pieces. Not invisible but functional…
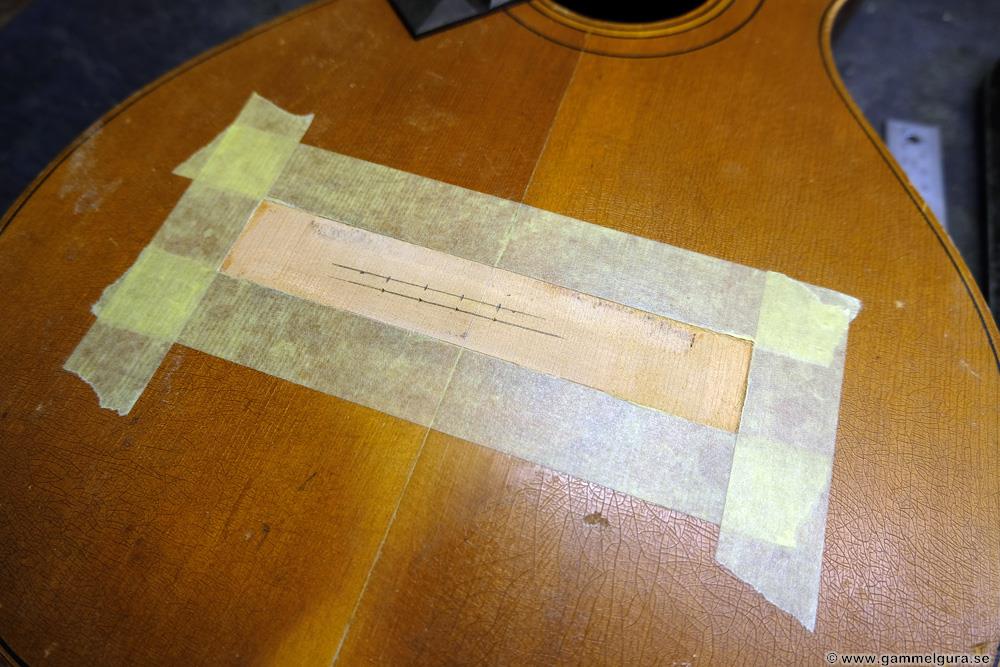
Here is a series of pictures of how I drill and mount the plugs at the string pin holes. I begin by placing the replica bridge on the top and mark the place with low-adhesive tape.

I marked the holes for the string pins in the bridge with the tip of a 4,5 mm wooden drill and drew a line through the marks. A second line was drawn 4 mm above, the plugs are 8 mm and I want half the plug to remain above the string pin holes when the holes for the string pins are drilled.
In order not to chip the spruce in the top, I first drill in the wrong direction with an 8 mm wooden drill.

Then I drill through the top and bridge plate with a thin 1 mm drill to be able to do the same thing on the inside.


I then drill through the last with a regular metal drill in the usual way. The spruce wood really wants to chip itself up, but if you do this you get no chips (almost).

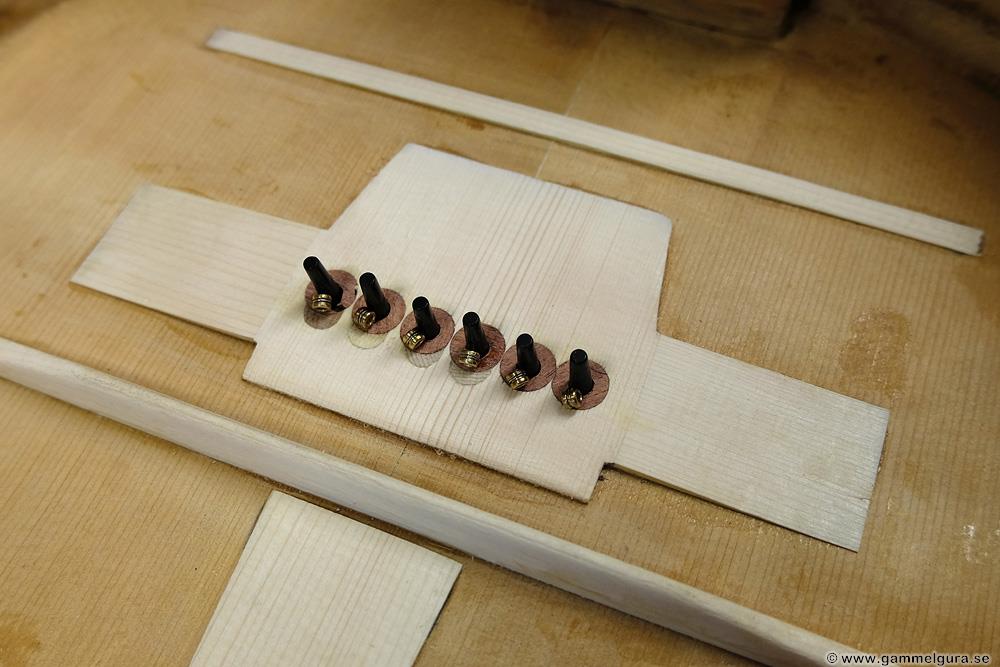
Because you want to attenuate the volume and treble from the unspun strings, only plugs on the 4 thickest strings are needed. The E-string gets a hard birch plug, on this the other three plugs are end wood of spruce. The plugs are glued with hot hide glue.


The holes for the string pins are drilled with a sharp 4,5 mm metal drill with the bridge in the right place.


Buttons in hardwood with pre-drilled holes in the middle are glued in using the tool from Stewmac. The best glue I have found for this is tough Superglue (Stewmac no 30), hot hide glue or thin superglue is quickly sucked into the spruce endwood and the button is not glued properly.


Gluing a semicircular button in a semicircular hole is not so easy, for them to sit straight, I clamp the buttons with some clamps and a caul. Plastic film is used to not glue the caul together with the top.

Finally, the bridge is glued with fresh hot hide glue, every time you heat up the HHG it loses a little of its strength.

To make grooves in the bridge for the strings for the solid string pins, I have a set of cut strings of the right thickness. The string pin holes are reamed and the grooves are sawn and filed with various tools. The pliers are used to pull up string pins that are wedged.

The end result is string ball ends that rest on both the hard button and the plug.

The work went on with gluing the bottom and neck.


The fine inlays were milled into the fretboard with a dremel.


Unfortunately, the shadow from the old tailpiec cannot be hidden.

The measurement of the intonation is among the last to be done. It is perhaps the most boring part of the whole process, but very important!


I have just made a longer and nicer jig to make the segmented saddle in my band saw jig. A point extraction takes care of the fumes from Superglue.


As I said, the finished GammelGura sounds as good as they usually do, even with ebony in the fretboard and bridge. I had run out of Gator cases at the time, but the customer was satisfied with a used TKL case.